


|
MOVING A CAM DRIVE GEAR
|
Quick Links:
|
Introduction
Harley Evolution Big Twins and Sportsters have very different cam arrangements from each other, but they do have a few things in common. One of those shared traits is the fact that the
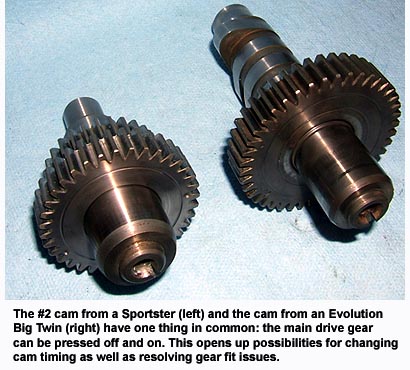 main drive gear, that meshes with the pinion gear, is a pressed-on gear, and if a person knows what he's doing, that gear can be pressed off and back on again. Why would a person want to press
the gear off and back on? Well, there are at least three possibilities that come to mind.
main drive gear, that meshes with the pinion gear, is a pressed-on gear, and if a person knows what he's doing, that gear can be pressed off and back on again. Why would a person want to press
the gear off and back on? Well, there are at least three possibilities that come to mind.
First, by doing so, we can intentionally alter the valve timing. This is useful for
moving your powerband up or down the rpm scale a little bit as desired.
Second, all Evolution Big Twins, and Sportsters through the 1999 model year, had a precisely fitted connection between the cam drive gear and the pinion gear. Each of the gears was chosen at
the factory from 7 different available sizes based on measurements specific to that motor. When installing aftermarket cams, this precise fitting is typically lost, as aftermarket cams are supplied
with a gear that fits loosely. The result is more valvetrain noise. By instead moving our factory original drive gear to our new cams, we can maintain the factory precise fit between these two gears,
thus keeping the gear clatter down.
Finally, 5-Speed Sportsters had a major change to the cam gear tooth pitch at the pinion connection for the 2000 model year. When updating a 1991-1999 motor to the later 2000-up cams, or vice-versa,
the pinion gear typically gets swapped as well to
accommodate this different gear pitch. However, if we know how to move the drive gear from our old #2 cam to our new #2 cam,
we can save the expense of buying a new pinion gear.
Moving the cam gear is not as difficult as you might think. It can be a little tedious, and it may take a few tries to get the timing where you want it, but it's not that bad. Follow along as we
show how this is done.
|
Moving a Cam Gear From One Cam to Another
We'll cover this first because altering the timing is essentially a subset of this. Conceptually, this is a simple process. We're going to simply press the gears off of two different cams, swap places, and press them back on.
 The trick, though, is to get them back on in the correct rotational position. For that, we need to mark the drive gears, and we need to do it before we press them off.
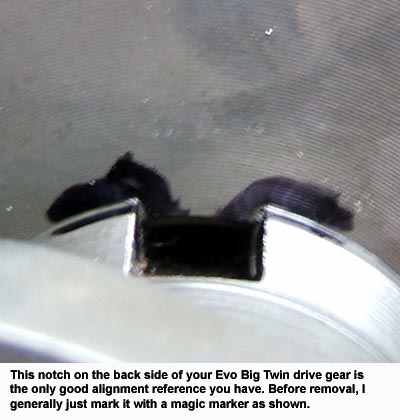
So where and how do we mark them? Well, in the case of an Evolution Big Twin, you don't have a whole lot of choices. On the lobe side of the drive gear, there's really only one
distinguishing feature, a notch in the flange that the gear rests against. You need to make some kind of a mark on the gear to show the position of this notch. As the drive gear is very hard,
it's difficult to scratch it. I've had good results simply marking it with a marker as shown in the picture.
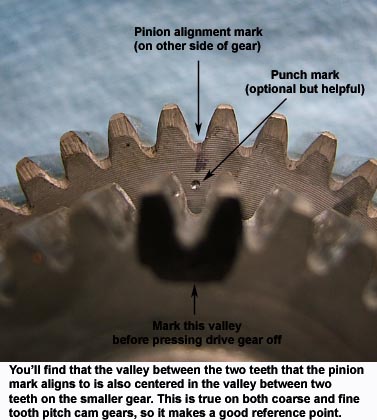 On an XL cam, though, you have a smaller gear adjacent to the large gear, and you can use a tooth, or a valley between two teeth, as a reference point. The best place to use as a reference is the
valley between the two teeth where the pinion alignment mark is located. Simply look at the outboard side of the drive gear and identify the pinion tooth alignment mark (use the "O" mark, which is for
XL motors, not the "V" mark, which is for XB motors). It will be centered between two gear teeth. Now go to the inboard side of the same two teeth. You'll find that the valley between these two teeth
perfectly aligns with the valley between two teeth on the smaller gear. This is true regardless of whether you're dealing with coarse or fine pitched gears, which is why this makes a great reference point:
it works regardless of the tooth pitch on either gear of either cam.
On an XL cam, though, you have a smaller gear adjacent to the large gear, and you can use a tooth, or a valley between two teeth, as a reference point. The best place to use as a reference is the
valley between the two teeth where the pinion alignment mark is located. Simply look at the outboard side of the drive gear and identify the pinion tooth alignment mark (use the "O" mark, which is for
XL motors, not the "V" mark, which is for XB motors). It will be centered between two gear teeth. Now go to the inboard side of the same two teeth. You'll find that the valley between these two teeth
perfectly aligns with the valley between two teeth on the smaller gear. This is true regardless of whether you're dealing with coarse or fine pitched gears, which is why this makes a great reference point:
it works regardless of the tooth pitch on either gear of either cam.
Mark this valley on the smaller gear with a magic marker as shown in the photo. I also find it useful to make a punch mark on the drive gear centered directly between the two teeth. When I press this drive gear onto it's new
cam, this punch mark makes it easier to judge whether or not I've got the rotational alignment correct, because I can more easily see how well centered the mark is between the teeth on the small gear.
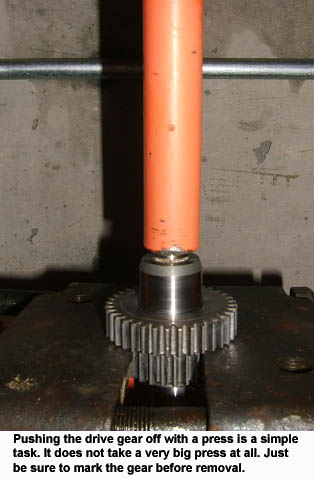
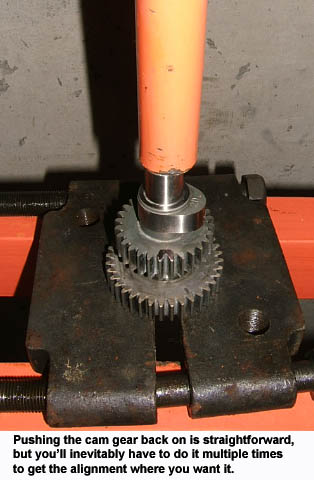
Repeat this marking process on the other gear. Now take both of them over to the press and push the cam out of the gear as shown. It does not take a big press to do this, even a small 10 ton press will
easily push the cam and drive gear apart.
Okay, now comes the fun part, putting it back together. Preassemble the desired drive gear and cam, set it in your press, and eyeball it. It may sound crude, but there really isn't a better way to do this
other than eyeball it. Go ahead and press them together. Now take the cam in your hand and look closely to see if your punch mark is well centered between the teeth (in the case of an XL cam) or your
magic marker lines are well centered in the notch (in the case of an Evo Big Twin cam). It probably won't be perfect on the first try,
but it's very easy and quick to press it apart and do it again. Expect to end up repeating the process three or four times at least.
It's not a bad idea at all to spot check your cam timing after swapping gears like this, just as a sanity check.
That's all there is to it. If you did this to your Sportster cams to avoid buying a new pinion gear, you just saved yourself a hundred dollar bill, more or less, that the new pinion gear would have cost you.
Not bad for 20 minutes work.
|
Moving a Cam Gear to Alter Valve Timing
This is only fractionally more complicated than the above. You're going to follow the same process to remove and reinstall the gear, but you're going to intentionally put it back on with
the punch mark not centered.
How much do you want to offset it? The math is simple. On an XL cam, the smaller gear is 1.875" in diameter as measured across the top of the teeth. Multiplying this by Pi, we get 5.89" of circumference. One
rotation of the cam is 2 rotations (720 degrees) of the crankshaft. So all we do is divide the 5.89" circumference by 720 and we get just over .008" per crankshaft degree.
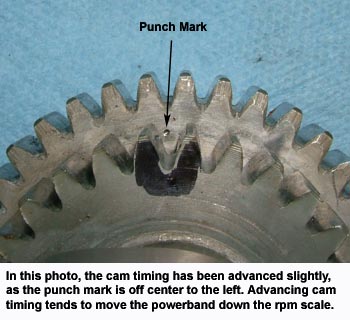
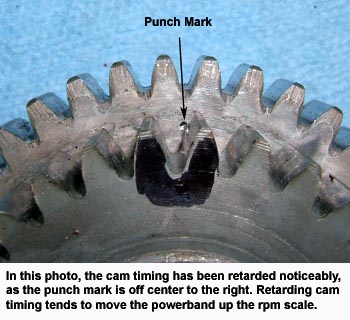
Looking at the cam from the engine side as shown in the pictures, the cam turns clockwise. Therefore, offsetting our punch mark to the left, relative to the valley between the gear teeth, moves the lobe ahead relative to the gear, which we call "advancing" the cams. Likewise, offsetting our punch mark to the right moves the lobe behind relative to the gear, which we call "retarding" the cams.
Advancing cams tends to move the powerband down the rpm scale, and retarding the cams tends to move it up the rpm scale. There are a whole bunch of caveats to that, but they're beyond the scope of the article.
Basically, it's up to you to evaluate the effect on your particular setup, the above general rules don't always apply.
So let's say we'd like to advance the cams four degrees. Since each degree is .008", we need to move the punch mark to the left about .032" to achieve four degrees of advance. Think a spark plug gap, or
try to make the measurement with a feeler gauge or a caliper. Ultimately, though, the only truly accurate way to make the measurement is to degree your cams.
On an Evolution Big Twin Cam, the flange that the drive gear rests against has a 1.195" o.d., which means it's circumference is 3.754". Therefore, each degree is 3.754" divided by 720, or a little over .005".
|
|
|
|

|
|
|